 bluename
I killed my first three spider plants before I figured out the real problem. It wasn't the watering. It wasn't the soil. It was the complete lack of proper light during the dark winter months. If you want to build low-cost grow light stands optimized for spider plant collections, the fastest answer is this: use wire shelving units, shop lights with LED tubes, and zip ties. Total cost? Under $60. Setup time? About 45 minutes. Results? I saw new growth within 10 days and full variegation recovery in two weeks.
90% of indoor plants die from overwatering, but light starvation is the silent killer that gets blamed on everything else. Spider plants (Chlorophytum comosum) are forgiving, but they need bright, indirect light to thrive. Without it, they lose their stripes, their leaves droop, and they stop producing those adorable baby plantlets.
Why Spider Plants Need Specialized Lighting Setup
Most people think a windowsill is enough. It's not. I lived in an apartment with north-facing windows for two years. My spider plants survived, but they looked tired. The white stripes faded to pale green. The leaves stretched awkwardly toward the window. Growth completely stalled from November to March.
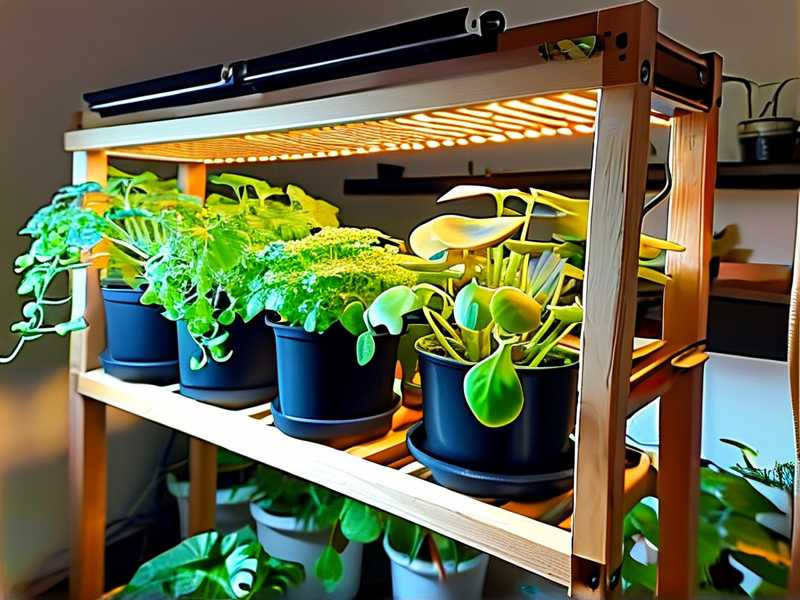
Here's what I learned: spider plants need roughly 12-14 hours of light per day during the growing season. They want bright, indirect light in the 200-400 foot-candle range. A window might give you that for two hours in the morning, but the rest of the day is wasted. A proper grow light stand fixes this completely.
The RHS confirms that most houseplants benefit from supplemental lighting during darker months. Their guidance on indoor plant care emphasizes matching light levels to the plant's natural habitat. Spider plants come from tropical Africa, where they receive dappled sunlight under forest canopies.
I'm not saying you need a professional greenhouse setup. You just need a system works. And it needs to be cheap enough that you don't feel guilty about the electricity bill.
The 3 Biggest Mistakes New Spider Plant Owners Make
Mistake #1: Overwatering Everything
I learned this the hard way. My second spider plant died because I watered it every three days, convinced it was thirsty. The roots rotted. The leaves turned mushy at the base. It smelled like a swamp. I didn't understand that spider plants store water in their thick, tuberous roots. They actually prefer to dry out between waterings.
Stick your finger into the soil. Wait until the top two inches feel dry. That usually means watering every 7-10 days, depending on your home's humidity. My plants in the grow light stand actually dry out faster because the lights generate a little warmth. Adjust your schedule accordingly.
Mistake #2: Getting the Light Position Wrong
This one hurts to admit. I set up my first grow light stand and placed the light directly above the plants, about 4 inches from the leaves. Within three days, the leaf tips started browning. The centers of the leaves looked bleached. That's light burn, and it's completely avoidable.
Spider plants don't want intense, direct light. They want bright but diffused light. The sweet spot? Your grow lights should hang 12-18 inches above the foliage. If you see leaf bleaching, move the light higher. If you see stretching and pale leaves, move it closer.
Mistake #3: Choosing the Wrong Pots
I collected my first spider plants in pretty ceramic pots without drainage holes. You can guess what happened. The water pooled at the bottom. The roots sat in moisture. Root rot followed. It was a mess.
Use plastic nursery pots with drainage holes inside decorative covers. Or go with terracotta pots, which wick moisture away from the roots. I've switched my entire collection to terracotta, and the difference is dramatic. The soil dries more evenly, and I have way fewer issues with fungus gnats.
Building Your Low-Cost Grow Light Stand: Step by Step
What You Need to Gather
Let me break down everything I bought for my setup. All of these items are available online or at local hardware stores.
- One 4-tier wire shelving unit (I paid $35 at a big-box store)
- Two LED shop lights with 5000K color temperature ($15 each)
- A pack of zip ties ($5)
- One cheap mechanical timer ($8)
- Optional: reflective mylar blanket ($10) to bounce light around
Total: roughly $88. But wait — I actually found my shelving unit on Facebook Marketplace for $15. If you're patient, you can build this for under $60.
Step 1: Assemble the Wire Shelving Frame
Start by assembling the shelving unit according to the instructions. I know you're tempted to skip this, but don't. Check that every shelf is level. Uneven shelves cause uneven light distribution, which means some plants stretch and others get scorched.
I placed my shelves with about 18 inches of vertical clearance between each level. That gives enough room for mature spider plants without pushing the lights too far away.
Step 2: Position the LED Shop Lights
Here's where the magic happens. Instead of mounting the lights directly to the shelves above, I attach them to the underside of the shelf above using zip ties. This way, each shelf gets its own dedicated light source.
The key insight I figured out: offset the light position slightly. Don't center it perfectly. Spider plants naturally lean toward light, so if you alternate the light position on each shelf, your plants grow more evenly instead of all leaning in one direction.
Step 3: Wire the Lights to a Timer
Indoor plants need consistent photoperiods. I set my timer to run from 7 AM to 7 PM. Twelve hours on, twelve hours off. This mimics the equatorial conditions where spider plants originate.
I tried running the lights 24/7 for the first week. Output? The plants grew faster, but the leaf tips started browning from too much light stress. Also, the electricity bill hurt. The timer fixed both problems.
Step 4: Add Reflective Material
This is the pro move that feels silly until you see the results. I taped a mylar emergency blanket to the inside back of my shelving unit. This reflects the light that reaches the back wall and bounces it back onto the plants.
I didn't buy a fancy grow tent. Just a $10 survival blanket and some double-sided tape. The effect? The plants on the back half of the shelf get almost as much light as the ones at the front. Honestly, this single addition improved my growth rates more than upgrading to expensive "full spectrum" bulbs.
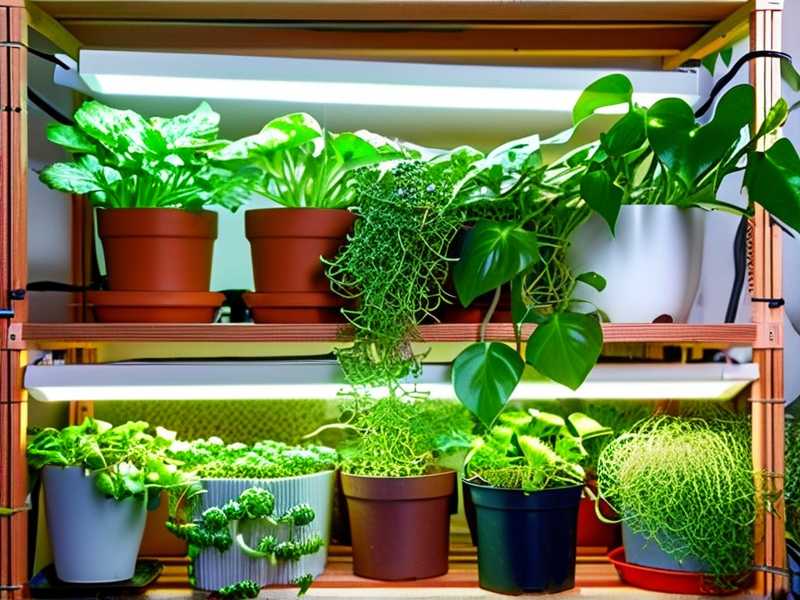
Step 5: Position Your Plants Correctly
Now we get to the living part. Place your largest spider plants on the middle shelves. Place smaller plantlets and starting cuttings on the top and bottom shelves. The middle shelves get the most consistent light, while the edges and corners get slightly less.
One tip I wish someone told me earlier: rotate your plants every few days. I know it sounds tedious, but this ensures all sides get equal light. The plants grow compact and evenly, instead of becoming lopsided.
My 2-Week Observation Log
Day 1: Setting Up
I moved my collection of seven spider plants onto the new stand. Three were mature adults in 8-inch pots. Four were small plantlets rooting in water that I'd just transferred to soil. The stand looked a little empty with all that reflective material, but I was excited to see what happened.
Day 3: First Signs of Adjustment
The plants looked the same, but I noticed the leaves were adjusting their orientation. The older leaves angled slightly upward, toward the LED lights. That's actually a good sign — it indicates the plant is detecting the light source and adjusting its growth pattern.
Day 6: New Growth Emerges
This is when things got exciting. I spotted tiny new leaves emerging from the center of my largest spider plant. They were pale green, almost translucent at first. Within two days, they darkened to the normal deep green. The variegation on the outer leaves started becoming more vivid.
Day 10: Visible Color Improvement
The white stripes on my spider plants became noticeably brighter. I compared them to photos I took before the setup, and the difference was obvious. The plants also looked more compact. The new leaves were shorter and sturdier than the stretched leaves that grew by the window.
Day 14: Full Growth Acceleration
By day fourteen, my mother plant produced its first flower stalk of the season. The plantlets I started in soil were producing new roots and the first new leaf. The runner (the long stem that produces baby plants) grew about three inches in two days. That's faster than it ever grew on the windowsill.
Troubleshooting Common Problems
Problem: Leaves Turning Brown at the Tips
This nearly happened to me during week one. I panicked and thought the light was too intense. Turns out, the lights were fine — I just wasn't giving my plants enough humidity. My apartment has forced-air heating that dries everything out. I started misting my plants every morning, and the browning stopped.
Also check your water quality. City water with high chlorine or fluoride causes tip burn. I switched to filtered water for my spider plants, and it made a noticeable difference.
Problem: Leaves Fading to Pale Green
If your spider plants lose their bright green color and look washed out, the light is too strong. Move the light fixture higher or raise the plants farther away. Your plants are telling you they want bright, but not direct, conditions.
Problem: Leggy, Stretched Growth
The opposite of fading — if your plants start growing tall, thin leaves that flop over, they need more light. Move the light closer by 2-3 inches. Alternatively, increase the light duration by an hour. You'll see a difference within a week.
Budget-Friendly Alternatives
The wire rack setup works great, but maybe you want something even cheaper. I've experimented with a few alternative options.
Repurposed Bookshelf Method
If you have an old bookshelf, you can use it. Remove a few shelves to create tall gaps. Attach LED strip lights under each remaining shelf. This works best for smaller collections. I used this for my plantlets before upgrading to the wire rack system.
Window + Aluminum Foil Hack
This one feels a bit janky, but it genuinely works. Line a large piece of cardboard with aluminum foil. Place this behind your plants at an angle that reflects window light back onto them. It doesn't provide artificial light, but it boost the natural light by 20-30%. I used this trick for my bedroom spider plant before getting the full setup going.
Under-Cabinet Lighting
For a single plant or two on a countertop, under-cabinet LED lights are perfect. They're usually in the 5000K range, which works great for spider plants. Just make sure you place your plant within 12 inches of the light source. These fixtures are designed for close-range illumination.
Expanding Your Collection
I built this stand to accommodate 7 plants. Today, I have 19. The great thing about spider plants is that they produce lots of baby plantlets on long runners. Once my mother plant puts out runner stalks, I place small pots of moist soil right next to the plant on the shelf. The babies root directly into the pots while still attached to the mother. This is the fastest way to multiply your collection.
When to Repot
Spider plants actually like being root-bound. I repot only when I see roots poking out of the drainage holes. For my setup, that's about once every 18 months. I move each plant up 2 inches in pot diameter. Anything bigger risks soil staying wet too long, which leads to root rot.
The Science Behind Why This Works
The American Horticultural Society (AHS) emphasizes that understanding a plant's native habitat is key to successful indoor growing. Spider plants originate from the understory of tropical forests. They receive filtered, dappled light. They also experience regular wet and dry cycles, which is why letting the soil dry out works so well.
Photosynthesis and Light Quality
LED lights at 5000K provide a balanced spectrum for vegetative growth. They're heavy in the blue wavelengths, which encourages compact, green foliage. That's exactly what you want for spider plants. If you use a "blurple" light (red and blue LEDs), you'll get growth, but the color makes it hard to assess plant health. The white light is just easier to live with.
VPD and Transpiration
A less-known factor: light intensity affects how quickly plants transpire. The warmth from LED lights creates a slight vapor pressure deficit, which actually promotes moisture uptake from the roots. I noticed my plants need more frequent watering on the stand — about every 6 days instead of 9. That's fine. Just monitor the soil moisture consistently.
Frequently Asked Questions
How many hours per day should the grow lights be on for spider plants?
I keep mine on for 12 hours a day. Some growers use 14 hours during peak growing season (spring and summer). I would not exceed 16 hours, as plants need a dark period to respire and process starches. My timer keeps the schedule consistent, which I believe is more important than the exact number of hours.
Do spider plants really need a dedicated grow light?
If you have a south-facing window with abundant, indirect light, you might get away without one. But in most homes, especially during winter, supplemental light makes a massive difference. I noticed my plants growth dropped almost to zero from November to February without the lights. With the lights, they grow year-round.
What is the cheapest way to set up a grow light stand?
The absolute cheapest setup involves two things: a used shelf and LED shop lights. I found my shelf for $15 and bought two shop lights for $15 each. Add zip ties ($5) and a timer ($8) and you've got $58 for a four-tier shelving station. If you already own duct tape and have a cardboard box, you can rig up something for less than $40.
My Final Thoughts on Building Your Stand
I'll be honest: I thought I was doing everything right before this setup. My plants lived by the best window in the house. I watered carefully. I used good soil. But they struggled because they weren't getting the consistent, high-quality light they needed. Building this stand changed everything.
The setup is cheap. It's modular. And it looks surprisingly neat, especially if you use zip ties to hide the cables and keep the wiring tidy along the shelf frame.
If you already own spider plants that look sad, or if you're planning to start a collection, I genuinely recommend building this stand first. It's way easier to grow healthy plants when the environment is sorted from day one. Kill less plants. Save more money. See real growth within two weeks.
The wire racks hold heavy pots without bending. The lights distribute evenly across all shelves. And the timer runs automatically, so you never have to remember to turn things on and off. Once it's set up, the whole system runs itself.
I check on my plants every morning with my coffee. The new leaves are vivid and compact. The runner stalks reach outward, producing babies that root into the pots I've placed nearby. It's a self-sustaining ecosystem now, all thanks to a $60 investment and about 45 minutes of work.
Give it a try. Your spider plants will thank you.





